I wanted full control over my VM infrastructure without the unpredictable billing of public clouds. OVH’s bare metal + vRack combo is cheap and gives you a real private network, so I set up CloudStack on it. After a few months of running this in production, here’s the complete walkthrough.
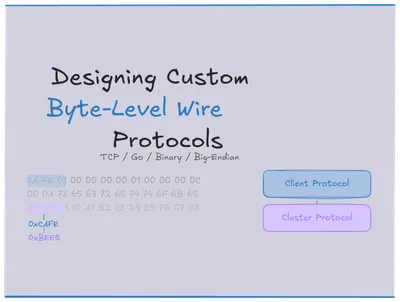
We’re building an all-in-one Apache CloudStack instance on a single OVH dedicated machine. This one host runs the management server, MySQL, NFS storage, and KVM hypervisor — everything needed for a working cloud. It’s based on the Apache CloudStack Quick Installation Guide and targets CloudStack 4.22 on Rocky Linux 8 or 9.
Edit the values below to match your setup. All instances in the guide update automatically.
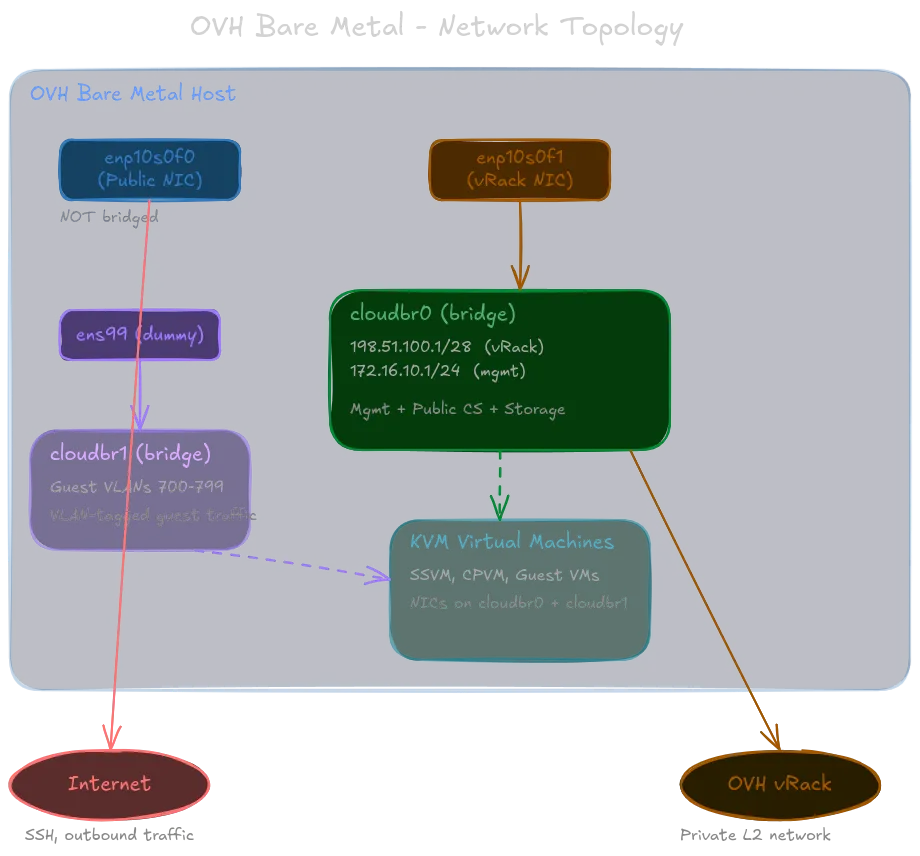
Here’s the network topology we’re building — three distinct paths, each with a specific role:
Why CloudStack?
Now, before we dive in, I want to quickly cover exactly why I chose CloudStack for this project. There are plenty of open-source cloud platforms out there — OpenStack, Proxmox, oVirt, etc. — so why CloudStack?
Simple put, CloudStack is a clean, well-documented, and mature platform that does exactly what I need without unnecessary complexity. It has a straightforward architecture, a user-friendly UI, excellent support for KVM, and a in-house Kubernetes as a service system. For an all-in-one setup on a single host, it hits the sweet spot of features vs. simplicity.
This is in comparison to something like OpenStack which is designed for much larger scales, and higher degress of customization, but that also means more moving parts, a steeper learning curve, and more maintenance overhead. CloudStack’s design is more monolithic and less modular than OpenStack, but for a single-host deployment, that actually makes it easier to set up and manage.
Prerequisites
Before you begin:
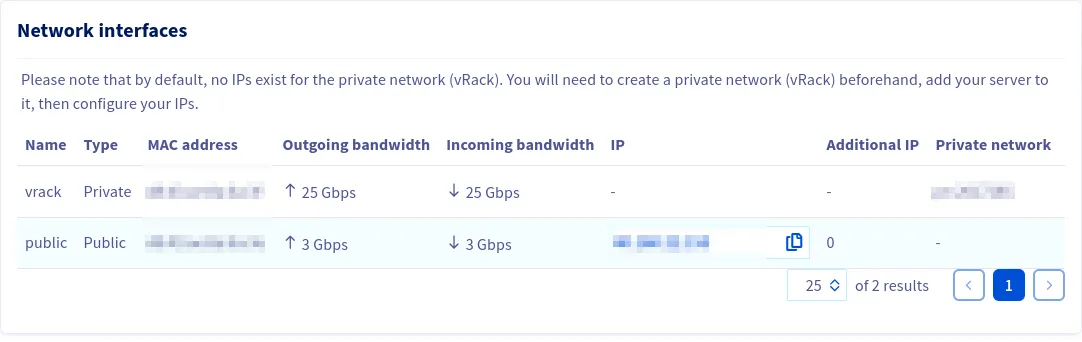
- OVH Control Panel — order a vRack (free), add your server to it, and add your /28 IP block to the vRack.
- DNS — point your CloudStack domain (e.g.
%%DOMAIN%%) to the server’s public IP. This is required for TLS later. - Identify your NICs — run
ip link showand match MACs against the OVH panel. The public NIC is typically the first port; the one labelled “Private” is the vRack NIC.
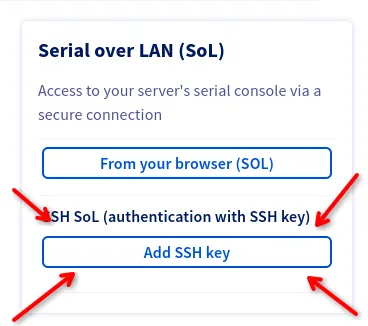
- IPMI/KVM access — we’re going to reconfigure networking, which can drop your SSH session. Have Serial over LAN ready via the OVH IPMI panel before proceeding.
Operating System
Start with a full system upgrade and install some basic tools we’ll need throughout:
dnf -y upgradednf install -y chrony wget tar bash-completion net-tools bind-utilsSELinux
Setting SELinux to permissive means it logs policy violations but does not enforce them. This weakens the security posture of the host. If you plan to run this in production, consider writing a custom SELinux policy for CloudStack instead.
CloudStack requires SELinux in permissive mode. Set it for the running system:
setenforce 0Then make it persist across reboots by editing /etc/selinux/config:
SELINUX=permissiveSELINUXTYPE=targetedNTP (Chrony)
If a host shows “Alert” in the CloudStack UI with no obvious cause, check clock sync first. Even a few seconds of drift can trigger it.
CloudStack is very sensitive to clock drift.
systemctl enable chronydsystemctl start chronydThe default chrony configuration is fine for our purposes.
Configuring the CloudStack Package Repository
Create /etc/yum.repos.d/cloudstack.repo:
[cloudstack]name=cloudstackbaseurl=http://download.cloudstack.org/centos/$releasever/4.22/enabled=1gpgcheck=0We also need to disable firewalld since we’ll manage iptables directly:
systemctl disable --now firewalld 2>/dev/null || trueKernel Modules
CloudStack needs br_netfilter for bridge-aware netfilter processing. We also need the dummy module to create a virtual interface for the guest traffic bridge.
cat > /etc/modules-load.d/cloudstack.conf << 'EOF'br_netfilterdummyEOF
modprobe br_netfiltermodprobe dummy
The Dummy Interface
cloudbr1 is the guest traffic bridge. CloudStack creates VLAN sub-interfaces on it at runtime, but a Linux bridge needs at least one port to exist. Since there’s no dedicated physical NIC for guest traffic, we create a dummy interface called ens99 and use a systemd service so it survives reboots.
cat > /etc/systemd/system/dummy-ens99.service << 'EOF'[Unit]Description=Create dummy interface ens99 for cloudbr1Before=NetworkManager.service
[Service]Type=oneshotRemainAfterExit=yesExecStart=/usr/sbin/ip link add ens99 type dummyExecStart=/usr/sbin/ip link set ens99 upExecStop=/usr/sbin/ip link del ens99
[Install]WantedBy=multi-user.targetEOF
systemctl daemon-reloadsystemctl enable --now dummy-ens99.service
Configuring the Network
This section reconfigures networking and will likely drop your SSH session. Have IPMI/Serial over LAN access ready via the OVH panel before proceeding. If you lose connectivity, use the SoL console to debug with nmcli con show.
This is the most critical step and the one most likely to drop your SSH session.
The network layout is:
- Public NIC (
%%PUBLIC_NIC%%) — standalone, NOT bridged. Carries SSH and internet traffic only. - cloudbr0 — Linux bridge on the vRack NIC. Gets both the vRack /28 IP and the management IP. Carries management, public CloudStack, and storage traffic.
- cloudbr1 — Linux bridge backed by the dummy
ens99interface. Carries VLAN-tagged guest traffic.
The public NIC stays unbridged on purpose. On OVH, putting the public IP on a bridge triggers MAC-based filtering that drops your traffic.
First, clean up any stale connections:
nmcli con delete "System %%PUBLIC_NIC%%" 2>/dev/null || truenmcli con delete "Wired connection 1" 2>/dev/null || truenmcli con delete cloudbr1-port0 2>/dev/null || truePublic NIC (standalone)
nmcli con add type ethernet \ con-name public \ ifname %%PUBLIC_NIC%% \ ipv4.addresses "%%PUBLIC_IP%%/24" \ ipv4.gateway "%%PUBLIC_GW%%" \ ipv4.dns "8.8.8.8" \ ipv4.method manual \ ipv6.method disabled \ connection.autoconnect yescloudbr0 — vRack Bridge (Management + Public CloudStack traffic)
This bridge gets two IPs: the vRack /28 address (for public CloudStack traffic like virtual routers, SSVM, CPVM) and the management IP (for internal CloudStack communication).
nmcli con add type bridge \  con-name cloudbr0 \  ifname cloudbr0 \  ipv4.addresses "%%VRACK_IP%%/28,%%MGMT_IP%%/24" \  ipv4.method manual \  ipv4.never-default yes \  bridge.stp no \  bridge.forward-delay 0 \  ipv6.method disabled \  connection.autoconnect yes \  connection.autoconnect-slaves 1
nmcli con add type bridge-slave \  con-name cloudbr0-port0 \  ifname %%VRACK_NIC%% \  master cloudbr0
The ipv4.never-default yes prevents cloudbr0 from installing a default route — all internet traffic goes out the public NIC. STP is disabled because in a single-host setup with no bridge loops, it just adds a 30-second boot delay for no benefit.
cloudbr1 — Guest VLAN Bridge
nmcli con add type bridge \ con-name cloudbr1 \ ifname cloudbr1 \ ipv4.method disabled \ ipv6.method disabled \ bridge.stp no \ bridge.forward-delay 0 \ connection.autoconnect yesBring Everything Up
nmcli con up publicnmcli con up cloudbr0nmcli con up cloudbr0-port0nmcli con up cloudbr1
# Enslave dummy interface to cloudbr1 via ip link# (nmcli can't match 802-3-ethernet profiles to dummy devices reliably)ip link set ens99 master cloudbr1
Verify
ip addr show %%PUBLIC_NIC%%ip addr show cloudbr0bridge link showip route show defaultping -c 2 8.8.8.8ping -c 2 %%VRACK_GW%% # any IP in your vRack range

If SSH drops during this step, use the IPMI/SoL console and check that the public connection activated correctly with nmcli con show.
Kernel Parameters
cat > /etc/sysctl.d/99-cloudstack.conf << 'EOF'net.ipv4.ip_forward = 1net.ipv4.conf.all.forwarding = 1
net.ipv4.conf.all.rp_filter = 0net.ipv4.conf.default.rp_filter = 0
net.bridge.bridge-nf-call-iptables = 0net.bridge.bridge-nf-call-arptables = 0net.bridge.bridge-nf-call-ip6tables = 0
net.ipv4.conf.all.arp_announce = 2net.ipv4.conf.default.arp_announce = 2net.ipv4.conf.all.arp_ignore = 1net.ipv4.conf.default.arp_ignore = 1EOF
sysctl --system
What these do:
- ip_forward — required for CloudStack virtual routers to route traffic.
- rp_filter = 0 — disables reverse path filtering. OVH’s vRack introduces asymmetric routing where packets arrive on one interface but leave on another. Strict RP filtering silently drops those.
- bridge-nf-call-iptables = 0 — the one that catches most people. When enabled, bridged frames get processed by iptables rules meant for routed traffic, which mangles or drops CloudStack virtual router traffic.
- ARP tuning — prevents ARP flux on multi-homed hosts, where the host responds to ARP requests on the wrong interface and confuses switches.
iptables / NAT
dnf install -y iptables-services
iptables -Fiptables -t nat -Fiptables -X 2>/dev/null || true
iptables -P INPUT ACCEPTiptables -P FORWARD ACCEPTiptables -P OUTPUT ACCEPT
# Allow forwarding through both bridgesiptables -A FORWARD -i cloudbr0 -j ACCEPTiptables -A FORWARD -o cloudbr0 -j ACCEPTiptables -A FORWARD -i cloudbr1 -j ACCEPTiptables -A FORWARD -o cloudbr1 -j ACCEPT
# SNAT: give the management subnet internet access through this host's public IPiptables -t nat -A POSTROUTING -s %%MGMT_NET%%/24 -d %%MGMT_NET%%/24 -j RETURNiptables -t nat -A POSTROUTING -s %%MGMT_NET%%/24 -o %%PUBLIC_NIC%% -j SNAT --to-source %%PUBLIC_IP%%
The first NAT rule is a short-circuit — traffic staying within the management subnet doesn’t get rewritten. The second rule rewrites the source address of outbound management traffic so it can reach the internet.
Persist and enable:
service iptables savesystemctl enable iptablesBoot-Time Networking Service
Reboots don’t always replay things in the order you’d expect. This oneshot systemd service acts as a safety net — it runs after networking is online, before the CloudStack services, and idempotently ensures everything is in place.
cat > /usr/local/bin/ovh-cloudstack-networking.sh << 'SCRIPT'#!/bin/bashmodprobe br_netfilter 2>/dev/null || truesysctl -w net.ipv4.ip_forward=1 > /dev/nullsysctl -w net.ipv4.conf.all.forwarding=1 > /dev/nullsysctl -w net.bridge.bridge-nf-call-iptables=0 > /dev/null 2>&1 || truesysctl -w net.bridge.bridge-nf-call-arptables=0 > /dev/null 2>&1 || true
ip addr add %%VRACK_IP%%/28 dev cloudbr0 2>/dev/null || trueip addr add %%MGMT_IP%%/24 dev cloudbr0 2>/dev/null || true
ip link set ens99 master cloudbr1 2>/dev/null || true
iptables -t nat -C POSTROUTING -s %%MGMT_NET%%/24 -d %%MGMT_NET%%/24 -j RETURN 2>/dev/null || \iptables -t nat -A POSTROUTING -s %%MGMT_NET%%/24 -d %%MGMT_NET%%/24 -j RETURN
iptables -t nat -C POSTROUTING -s %%MGMT_NET%%/24 -o %%PUBLIC_NIC%% -j SNAT --to-source %%PUBLIC_IP%% 2>/dev/null || \iptables -t nat -A POSTROUTING -s %%MGMT_NET%%/24 -o %%PUBLIC_NIC%% -j SNAT --to-source %%PUBLIC_IP%%
echo "OVH CloudStack vRack networking configured"SCRIPTchmod +x /usr/local/bin/ovh-cloudstack-networking.sh
Every iptables command uses -C (check) before -A (append) so rules don’t stack on repeated runs.
Now create the systemd unit:
cat > /etc/systemd/system/ovh-cloudstack-networking.service << 'EOF'[Unit]Description=OVH CloudStack vRack Network SetupAfter=NetworkManager.service network-online.target dummy-ens99.serviceBefore=cloudstack-management.service cloudstack-agent.serviceWants=network-online.target
[Service]Type=oneshotRemainAfterExit=yesExecStart=/usr/local/bin/ovh-cloudstack-networking.sh
[Install]WantedBy=multi-user.targetEOF
systemctl daemon-reloadsystemctl enable --now ovh-cloudstack-networking.service
Reboot Verification
Before moving on, reboot the machine and verify that everything survives. This catches service ordering issues, missing enable flags, and transient network config that didn’t persist.
rebootAfter the machine comes back (use IPMI/SoL if SSH doesn’t reconnect), verify:
# Bridges exist with correct IPsip addr show cloudbr0ip addr show cloudbr1
# Dummy interface is enslaved to cloudbr1bridge link show
# Default route goes out the public NICip route show default
# Internet connectivityping -c 2 8.8.8.8
# vRack connectivityping -c 2 %%VRACK_GW%%
# iptables NAT rules persistediptables -t nat -L POSTROUTING -n --line-numbers
# Kernel modules loadedlsmod | grep -E 'br_netfilter|dummy'
# Sysctl values appliedsysctl net.ipv4.ip_forward net.bridge.bridge-nf-call-iptables
If anything is missing, fix it before proceeding — debugging networking issues after CloudStack is installed is significantly harder.
NFS Storage
Our configuration uses NFS for both primary and secondary storage, served from this same host.
dnf install -y nfs-utils
mkdir -p /export/primary /export/secondary
Configure the exports in /etc/exports. We allow access from both the management subnet and the vRack subnet:
cat > /etc/exports << 'EOF'/export/primary %%MGMT_NET%%/24(rw,async,no_root_squash,no_subtree_check) %%VRACK_NET%%/28(rw,async,no_root_squash,no_subtree_check)/export/secondary %%MGMT_NET%%/24(rw,async,no_root_squash,no_subtree_check) %%VRACK_NET%%/28(rw,async,no_root_squash,no_subtree_check)EOFNFSv4 requires the domain setting to match across all clients. Ensure that /etc/idmapd.conf has:
Domain = localStart the NFS services:
systemctl enable rpcbindsystemctl enable nfs-serversystemctl start rpcbindsystemctl start nfs-serverexportfs -ravDatabase Installation and Configuration
CloudStack uses MySQL for its database backend.
dnf -y install mysql-serverAdd the following to the [mysqld] section of /etc/my.cnf.d/mysql-server.cnf:
innodb_rollback_on_timeout=1innodb_lock_wait_timeout=600max_connections=350log_bin=mysql-binbinlog_format=ROWStart MySQL:
systemctl enable mysqldsystemctl start mysqldManagement Server Installation
Install the management server:
dnf -y install cloudstack-managementCloudStack 4.22 requires Java 17 JRE. The management server package pulls it in automatically, but if you had a previous Java version installed, confirm Java 17 is selected:
alternatives --config javaInitialize the database. This generates a random password for the cloud database user:
cloudstack-setup-databases cloud:$(openssl rand -hex 32)@localhost --deploy-as=rootYou should see “CloudStack has successfully initialized the database.” when it finishes.
Complete the management server setup:
cloudstack-setup-managementSystem Template Setup
CloudStack uses system VMs (SSVM, CPVM) that need a template downloaded to secondary storage. Since we’re on the NFS server itself, we use the local path directly:
/usr/share/cloudstack-common/scripts/storage/secondary/cloud-install-sys-tmplt \ -m /export/secondary \ -u http://download.cloudstack.org/systemvm/4.22/systemvmtemplate-4.22.0-x86_64-kvm.qcow2.bz2 \ -h kvm -FThis downloads and extracts the system VM template. It takes a few minutes depending on your connection.
KVM Setup and Installation
Since this is an all-in-one host, we’re using the management server as a compute node as well. We’ve already done the prerequisites (networking, SELinux, chrony, repo), so we just need the agent and KVM packages.
Installation
dnf -y install cloudstack-agent qemu-kvm libvirtQEMU Configuration
CloudStack requires QEMU to run as root. Edit /etc/libvirt/qemu.conf and ensure these lines are present and uncommented:
user = "root"group = "root"Libvirt Configuration
For live migration to work (relevant when you add more hosts later), libvirt needs to listen for unsecured TCP connections. We also disable multicast DNS advertising. Edit /etc/libvirt/libvirtd.conf and add:
listen_tls = 0listen_tcp = 1tcp_port = "16509"auth_tcp = "none"mdns_adv = 0On EL8/EL9, libvirt uses systemd socket activation by default, which conflicts with CloudStack’s expectations. Mask the socket units and override the service to use --listen mode:
systemctl mask libvirtd.socket libvirtd-ro.socket libvirtd-admin.socket libvirtd-tls.socket libvirtd-tcp.socket
mkdir -p /etc/systemd/system/libvirtd.service.dcat > /etc/systemd/system/libvirtd.service.d/override.conf << 'EOF'[Service]ExecStart=ExecStart=/usr/sbin/libvirtd --listenEOF
systemctl daemon-reloadsystemctl enable --now libvirtdsystemctl restart libvirtd
Verify libvirtd is listening on TCP:
ss -tlnp | grep 16509And verify KVM is loaded:
lsmod | grep kvmYou should see kvm_amd or kvm_intel depending on your CPU.
CloudStack SSH Key Setup
The management server generates an SSH keypair on first start. We need to add that public key to the root users authorized_keys so CloudStack can SSH into this host to manage it as a KVM hypervisor.
First, wait for the management server to finish its initial startup (it generates the key during this process):
# Wait for the key to appearwhile [[ ! -f /var/cloudstack/management/.ssh/id_rsa.pub ]]; do echo "Waiting for management server keypair..." sleep 5doneThen add it:
mkdir -p /root/.sshchmod 700 /root/.sshcat /var/cloudstack/management/.ssh/id_rsa.pub >> /root/.ssh/authorized_keyschmod 600 /root/.ssh/authorized_keyssystemctl restart sshdCloudStack Usage Server
The usage server tracks resource consumption for billing and reporting. It’s optional but good to have from the start.
dnf -y install cloudstack-usageEnable it via the CloudStack database:
mysql -u root cloud -e "UPDATE configuration SET value='true' WHERE name='enable.usage.server';"mysql -u root cloud -e "UPDATE configuration SET value='1440' WHERE name='usage.stats.job.aggregation.range';"mysql -u root cloud -e "UPDATE configuration SET value='00:15' WHERE name='usage.stats.job.exec.time';"Start the usage server:
systemctl enable cloudstack-usagesystemctl start cloudstack-usageNginx Reverse Proxy + TLS
By default, the CloudStack UI runs on port 8080 over plain HTTP. We’ll put nginx in front of it with a Let’s Encrypt TLS certificate.
dnf -y install epel-releasednf -y install nginx certbot python3-certbot-nginxBind CloudStack to localhost
Edit /etc/cloudstack/management/server.properties and set:
bind.interface=127.0.0.1This ensures the management UI is only accessible through nginx, not directly on port 8080.
Nginx Configuration
Create /etc/nginx/conf.d/%%DOMAIN%%.conf:
server {    listen 80;    server_name %%DOMAIN%%;
    location / {        proxy_pass http://127.0.0.1:8080;        proxy_set_header Host $host;        proxy_set_header X-Real-IP $remote_addr;        proxy_set_header X-Forwarded-For $proxy_add_x_forwarded_for;        proxy_set_header X-Forwarded-Proto $scheme;
        # WebSocket support (CloudStack console proxy)        proxy_http_version 1.1;        proxy_set_header Upgrade $http_upgrade;        proxy_set_header Connection "upgrade";        proxy_read_timeout 600s;    }}
Remove the default server block and start nginx:
rm -f /etc/nginx/conf.d/default.confnginx -tsystemctl enable --now nginxObtain TLS Certificate
certbot --nginx \ -d %%DOMAIN%% \ --non-interactive \ --agree-tos \ -m %%EMAIL%%Certbot will modify the nginx config in-place to add the TLS directives. Enable auto-renewal:
systemctl enable --now certbot-renew.timerUpdate CloudStack Endpoint
Tell CloudStack about its new HTTPS URL:
mysql -u root cloud -e "UPDATE configuration SET value='https://%%DOMAIN%%/client/api' WHERE name='endpoint.url';"Restart the management server to pick up the bind address change:
systemctl restart cloudstack-managementUI Access
Point your browser to https://%%DOMAIN%%. The default username is admin and the default password is password. The zone setup wizard will launch on first login.
Zone Configuration
After logging in, the zone wizard walks you through the initial setup. Here are the values to use with our configuration.
Zone Type
Select Advanced Zone.
Zone Details
| Field | Value |
|---|---|
| Name | zone1 |
| IPv4 DNS 1 | 213.186.33.99 |
| IPv4 DNS 2 | 1.1.1.1 |
| Internal DNS 1 | 213.186.33.99 |
| Hypervisor | KVM |
Why 213.186.33.99 instead of 8.8.8.8? CloudStack system VMs only have access to the vRack network, and OVH’s DNS servers are reachable there while Google’s public DNS is not. Using an unreachable DNS here will cause SSVM and CPVM to fail template downloads and patching.
Physical Network — Traffic Type Labels
All traffic except Guest goes over cloudbr0. Guest goes over cloudbr1.
| Traffic Type | KVM Label |
|---|---|
| Management | cloudbr0 |
| Public | cloudbr0 |
| Guest | cloudbr1 |
| Storage | cloudbr0 |
Public Traffic IP Range
These are the IPs CloudStack assigns to virtual routers, SSVM, CPVM, and static NAT. They come from your /28 block.
| Field | Value |
|---|---|
| Gateway | Last usable IP in /28 (e.g. %%VRACK_GW%%) |
| Netmask | %%VRACK_MASK%% |
| VLAN | (leave blank) |
| Start IP | First usable IP after your host’s bridge IP |
| End IP | Last usable IP before gateway |
Your host’s bridge IP (%%VRACK_IP%% in our example) is not in this range — it’s used by the host itself.
Pod Configuration
| Field | Value |
|---|---|
| Pod Name | pod1 |
| Gateway | %%MGMT_IP%% |
| Netmask | 255.255.255.0 |
| Start IP | %%POD_START%% |
| End IP | %%POD_END%% |
Guest VLAN Range
| Field | Value |
|---|---|
| VLAN Range | 700-799 |
These VLANs are used for isolated guest networks, tagged on cloudbr1.
Cluster
| Field | Value |
|---|---|
| Cluster Name | cluster1 |
| Hypervisor | KVM |
Host
| Field | Value |
|---|---|
| Hostname | %%MGMT_IP%% |
| Username | root |
| Password | (your root password, or leave blank if SSH key was set up) |
Primary Storage
| Field | Value |
|---|---|
| Name | primary |
| Protocol | NFS |
| Server | %%MGMT_IP%% |
| Path | /export/primary |
Secondary Storage
| Field | Value |
|---|---|
| Name | secondary |
| Provider | NFS |
| Server | %%MGMT_IP%% |
| Path | /export/secondary |
Finish
Click through to create the zone. CloudStack will add the host, start the Secondary Storage VM (SSVM) and Console Proxy VM (CPVM). Wait 5-10 minutes for system VMs to fully boot.
Verification
After zone creation, check that system VMs are healthy:
# Check system VM bridge assignmentsfor vm in $(virsh list --name); do echo "--- $vm ---" virsh domiflist "$vm"done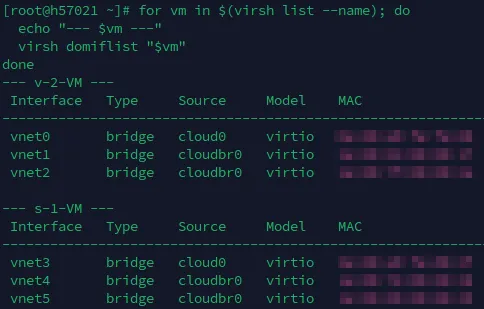
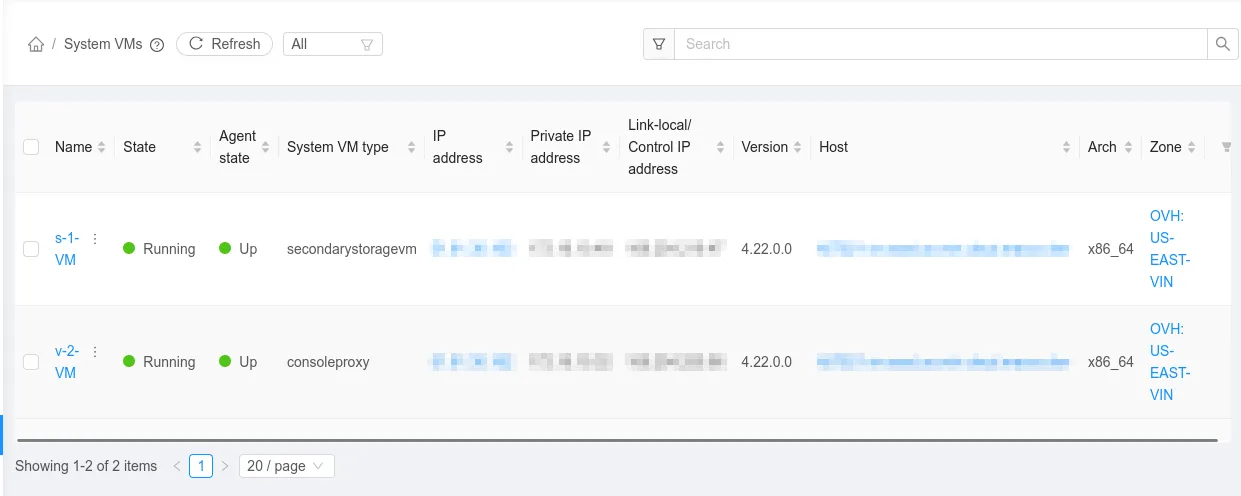
SSVM and CPVM should have NICs on cloudbr0 (management + public) and cloud0 (link-local). In the CloudStack UI, check the following:
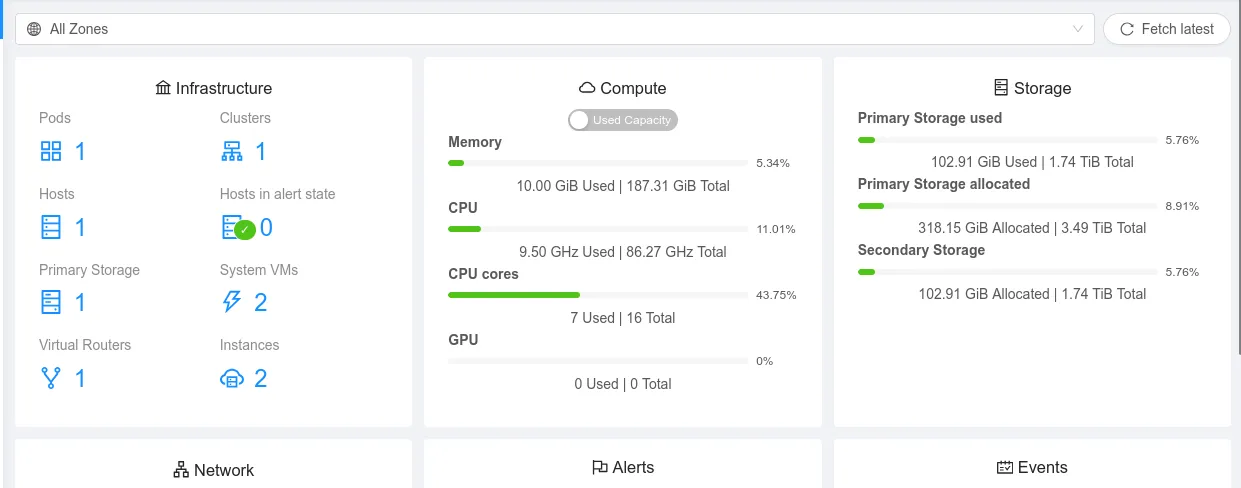
Infrastructure -> System VMs — both should show “Running”.
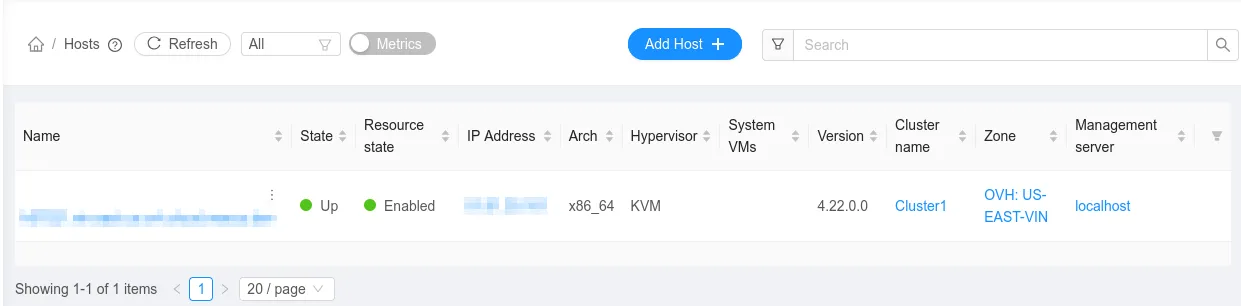
Infrastructure -> Hosts should show your host as “Up”.
Troubleshooting
Keep an eye on these log files:
/var/log/cloudstack/management/management-server.log/var/log/cloudstack/agent/agent.log
Host shows “Disconnected” — the agent can’t reach the management server. Verify cloudbr0 has the management IP (ip addr show cloudbr0).
Host shows “Alert” — usually clock drift. Run chronyc tracking and confirm the system time is in sync.
System VMs won’t start — NFS mount failure. Run showmount -e %%MGMT_IP%% and try a manual mount from the management IP.
VMs have no public connectivity — verify the /28 IP block is assigned to the vRack in the OVH control panel and that the vRack NIC is enslaved to cloudbr0 (bridge link show).
SSVM/CPVM on wrong bridge — traffic type labels are wrong. Fix them in the database, restart the agent, and recreate the system VMs.
Live migration fails (after adding more hosts) — ensure port 16509 (libvirt) and 49152-49216 (QEMU migration) are reachable between hosts over the vRack.
Security Considerations
This guide prioritizes getting a working deployment over hardening. Before running anything important on it, address these:
gpgcheck=0 on the CloudStack repo — we disabled GPG verification because CloudStack’s RPM repo doesn’t consistently sign packages. This means dnf won’t verify package integrity. If you’re concerned about supply chain attacks, download packages manually, verify checksums against the Apache release page, and install with rpm -ivh.
auth_tcp = "none" on libvirt — unauthenticated TCP is fine when libvirt is only reachable over the vRack (private L2). If you add more hosts, any machine on that vRack segment can control your hypervisor. For multi-host deployments, switch to TLS (auth_tls) or SASL authentication.
No iptables INPUT filtering — we set INPUT ACCEPT with no restrictions. The host relies entirely on OVH’s upstream firewall and the assumption that the vRack is trusted. At minimum, add INPUT rules to restrict management ports (8080, 8250, 16509, 3306) to the management subnet and drop everything else from the vRack.
Root SSH with authorized_keys — CloudStack manages the hypervisor over SSH as root. This is by design, but it means anyone with the management server’s private key (/var/cloudstack/management/.ssh/id_rsa) has root on every host. Protect that key and restrict SSH access by source IP where possible.
What’s Next
You now have a working CloudStack cloud on a single OVH bare metal machine. From the UI you can:
- Deploy VMs — create instances using the built-in templates or upload your own ISOs.
- Add more hosts — order another OVH server, add it to the same vRack, repeat the KVM agent setup, and add it as a host in the existing cluster.
- Set up backups — CloudStack doesn’t handle backups natively. Look into snapshotting the NFS exports or using a dedicated backup solution.
- Configure offerings — create compute, disk, and network offerings that match your capacity.
For an OVH Advance-2 (roughly $80/month), you get 64GB RAM and plenty of CPU to run a dozen or so VMs. Compare that to the equivalent on AWS or GCP and the math speaks for itself — especially for always-on workloads.
For deeper reading, the CloudStack Administration Guide covers everything from network models to storage plugins. The CloudStack mailing lists are also surprisingly active and helpful if you get stuck.